
Although it is a basic content, but it seems that there are still many people who do not know how to do it. If you are new to Mac, please refer this. Today in this article we will explain you how to crop screenshot on Mac.
◆ How to crop screenshot on Mac?
It’s a good idea to remember the following three ways to crop screenshots.
-
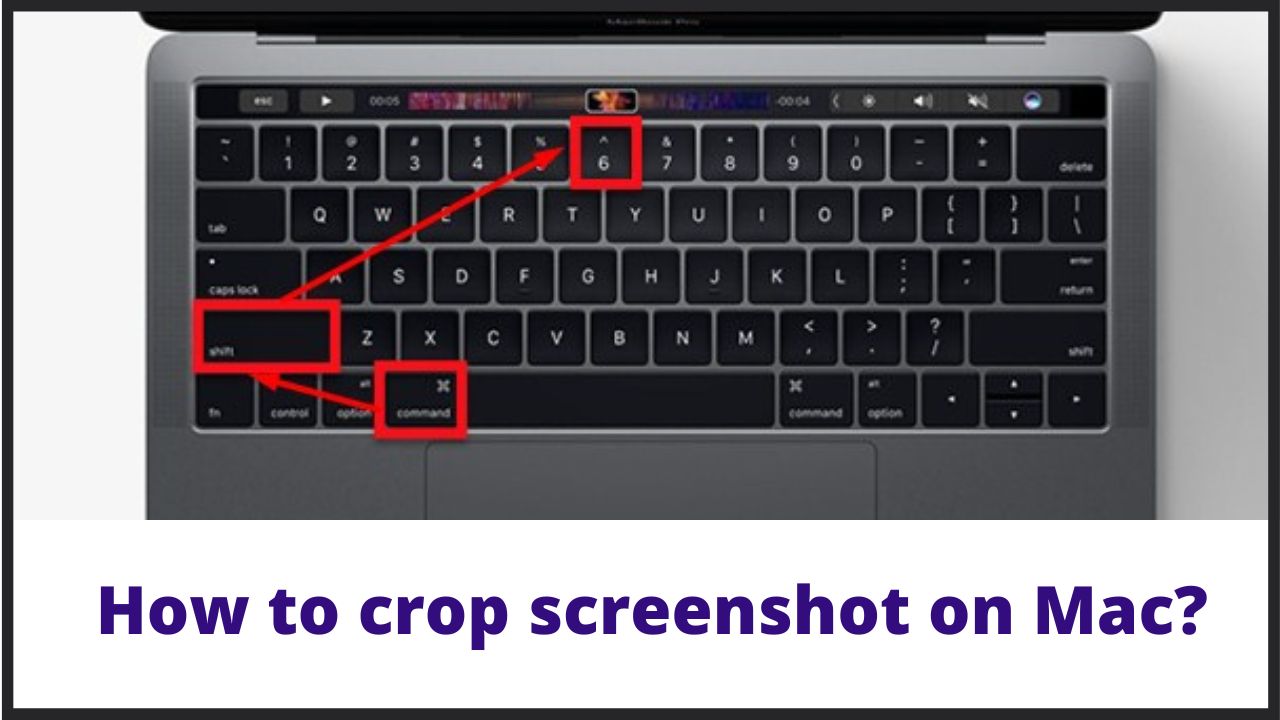
Crop the entire screen:
“Command” + “Shift” + “4” + “Space key”
A mouse pointer for the camera mark will appear, so you can save a screenshot of the entire screen by clicking it or pressing the enter key.
-
Crop a screenshot of a full screen window:
“Command” + “Shift” + “3”
While the above “Crop the entire screen” method does not include the menu bar at the top of the screen or the Dock at the bottom of the screen, this method saves a screenshot of the full-screen window like the “PrtScr key” on a Windows PC.
-
Crop a screenshot by specifying the range:
“Command” + “Shift” + “4” → Click to specify the range and release your finger to shoot.
You can take and save screenshots by specifying the range. This is a convenient method when you want to take a screenshot of a specific part.
-
Crop Screenshot
Next, I will introduce how to crop the screenshot taken by the above method.
- This time, let’s say that you want to trim (cut) the part surrounded by the red frame.
- First, double-click the image file saved in the screenshot to open it from the preview, and click the icon surrounded by the red frame.
- Next, click “Select with rectangle” . (Use an ellipse depending on the application)
- Select the area you want to cut with the mouse or trackpad clicked, then release the click button to fine-tune the area and click the “Cut” button.
- Crop is now completed.
◆ Basic way to crop screenshots on Mac:
If you want to edit screenshots quickly, your Mac has everything you need. You can easily crop screenshots on your Macbook pro using the preview app or the photo app.
-
App preview:
The preview app is a built-in Mac feature that provides similar features that you can use to edit images and screenshots, such as resizing, cropping, annotations, and rotating. Here’s a quick look at how to crop screenshots using the preview app on your Mac.
- Double-click on the image to open it in preview. Alternatively, right-click on the image file and open with Then select Preview.
- To select an area, drag the mouse cursor to the area you want to crop. This will cause a dotted line to appear around the selected area.
- Press the K and Command keys to remove the part of the image that is outside the selected area.
- Finally, save the file in place.
-
Photo app
Another built-in feature is the photo app. It’s also easy to crop screenshots on your Mac.
- When you open the screenshot in Photo view, you’ll see a selection rectangle.
- Drag the corners or edges of the rectangle. As soon as you release the selected rectangle, you will see a cropped screenshot.
- Straighten the screenshot with the number dial on the right side of the image. For better trimming, you can use the Aspect and Flip XNUMX trimming options.
- Finally, save the cropped screenshot.
With the help of preview and photo features, you have great cropped screenshots.
◆ How to crop screenshots on Mac in high quality?
A great option for cropping high quality screenshots on Mac is Blu-ray Master Screen Recorder . It provides a simple and free way to take screenshots on your Mac, and you can even easily crop your screenshots. Besides cropping, you can draw rectangles, arrows, lines, etc. in screenshots and add captions to images.
- Crop high quality screenshots on Mac.
- Take a screenshot of the full screen or customized area on your Mac.
- Save the screenshot in an image format such as JPG, PNG.
- Powerful editing function to edit screenshots and add various elements.
- Record online videos, gameplay, webcams, voice calls, music and more.
◆ FAQs
On Mac, we provide a way to take screenshots using keyboard shortcuts. Command (⌘) + Shift + 3 to see a screenshot of the entire screen . Command (⌘) + Shift + 4 to see a screenshot of a specific section of the screen . To see a screenshot of a window or menu, Command (⌘) + Shift + 4 and the spacebar.
Q.1. Can I record the screen on my Mac?
Yes, you can use the above Blu-ray Master Screen Recorder to help you record screen activity on your MacBook.
Q.2. Can I create a screen capture in Windows 10 ?
Press Win + Shift + S to take a screenshot on your Mac 10. This hotkey opens a small clipping menu at the top of the screen. Then select the type of screenshot you want to capture.
Now you should know how to crop screenshots on Mac. Blu-ray Master Screen Recorder is more than just a clipping tool, if you want to take screenshots or capture gameplay , video / audio on your desktop screen or computer.
I’m sourav, from Kolkata. A tech lover and love to answer any tech-related queries. I just try answering all questions like my problem.